Western Instruments takes its lead role, as the World’s Premier Manufacturer of Corrosion Pit Depth Gauges, very seriously. As such, customers are always asking distributors about Calibration Certificates for new Pit Gauges, as well as the frequency for subsequent recertification. To start, we only supply a Certificate of Compliance on a new Pit Gauge if it is requested on a purchase order. We don’t charge for this because not may customers ask for them. In North America a new gauge or instrument is often not supplied with documentation as the new condition implies accuracy. In immerging economies, and the over documented European Union, a Certificate is often a purchase requirement
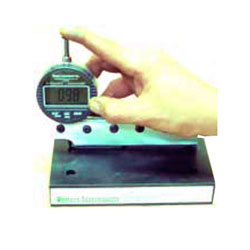
The product picture shows an N88-FBH Calibration Block being used to calibrate a Digital Pipe Pit Gauge (N88-9B-D). The Calibration Block is equipped with 4 Flat Bottom Holes of various nominal depths, namely 2.5mm, 5mm, 7.5mm, and 10mm (0.100”, 0.200”, 0.300”, & 0.400”). The Flat Bottom Holes are intentionally made not completely flat, as to simulate the irregular surface of corrosion or erosion, and to ensure the technician Scans through the varying depth, to ensure the Gauge is working correctly and to verify the certified shallow and deepest portions of each Artificial Indication. N88-FBH Calibration Blocks are provided with a Calibration Certificate and are traceable to NIST and other regulatory organizations.

If a distributor wants to start providing Certificates, we can simply provide our Adobe file, and they can be printed as required. We encourage distributors to provide a Recalibration Service for their customers, so a value added service is added to their business. As a manufacturer, we encourage our distributors to grow the knowledge base of their business, which in turn will enhance their position in their local corrosion industry. A distributor’s purchase and maintenance of a N88-FBH Calibration Block is a prerequisite to being set up as an Authorized Calibration Agency.
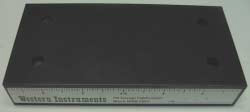
The Calibration Block shown above is 150mm long x 75mm wide x 25mm thick (6” x 3” x 1”). N88-FBH’s are machined from 1020 Cold Finished Steel and are corrosion protected with a Conversion Coating. Complying with ASTM, NACE, and other applicable reference standards, Specifications, for similar reference samples, recertification is only required if there is physical damage that may inhibit the use or accuracy of the Standard. As illustrated, the 4 Flat Bottom Holes are positioned in each corner of the sample, 19mm (0.75)”) from each corresponding edge. N88-FBH’s are supplied with a label, which includes a Centering Rule, for technician reference.
The product picture shows an N88-FBH Calibration Block being used to calibrate a Digital Pipe Pit Gauge (N88-9B-D). The Calibration Block is equipped with 4 Flat Bottom Holes of various nominal depths, namely 2.5mm, 5mm, 7.5mm, and 10mm (0.100”, 0.200”, 0.300”, & 0.400”). The Flat Bottom Holes are intentionally made not completely flat, as to simulate the irregular surface of corrosion or erosion, and to ensure the technician Scans through the varying depth, to ensure the Gauge is working correctly and to verify the certified shallow and deepest portions of each Artificial Indication. N88-FBH Calibration Blocks are provided with a Calibration Certificate and are traceable to NIST and other regulatory organizations.

If a distributor wants to start providing Certificates, we can simply provide our Adobe file, and they can be printed as required. We encourage distributors to provide a Recalibration Service for their customers, so a value added service is added to their business. As a manufacturer, we encourage our distributors to grow the knowledge base of their business, which in turn will enhance their position in their local corrosion industry. A distributor’s purchase and maintenance of a N88-FBH Calibration Block is a prerequisite to being set up as an Authorized Calibration Agency.
The Calibration Block shown above is 150mm long x 75mm wide x 25mm thick (6” x 3” x 1”). N88-FBH’s are machined from 1020 Cold Finished Steel and are corrosion protected with a Conversion Coating. Complying with ASTM, NACE, and other applicable reference standards, Specifications, for similar reference samples, recertification is only required if there is physical damage that may inhibit the use or accuracy of the Standard. As illustrated, the 4 Flat Bottom Holes are positioned in each corner of the sample, 19mm (0.75)”) from each corresponding edge. N88-FBH’s are supplied with a label, which includes a Centering Rule, for technician reference.
| Item | Description | Price | ||
|---|---|---|---|---|
N88-FBH | Pit Gauge Calibration Block | $292.00 |
In stock
1 Week Lead Time (Estimated)
2-3 Week Lead Time (Estimated)
Lead Time Varies, Please contact us for availability.
Unavailable


