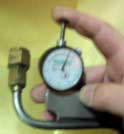
As Western’s Pit Gauge Product Series gains popularity, we are able to address various industry needs. As Pressure Equipment Regulators have started to address safety issues related to Instrumentation Tubing, a means to improve Weld Quality arose. The old adage that “if it looks good, it has to be good” is actually meaningful with Welding. Weld Quality starts with good tubing fit-up prior to welding, in that if all edges are fit uniformly, the less welder skill is required to ‘run a nice bead’. Poor fit-up requires a highly skilled welder to ensure his welding blends the abutting edges together smoothly.
If a welder has to pay extra attention to blend his weld, he runs a greater risk of changing his feed rate. This change in feed rate may cause him to slow and create excessive heat, and thus he runs a greater risk of producing undercut. Therefore, give the welder the tools to better fit up his work piece, and he’ll produce a better weld. If he runs into difficulty, give him the tools to evaluate his undercut.
Western has offered our Reaching Pit Gauge for many years, however the Blade is 4 ¾” (121mm) long. In the case of Instrument Tubing, diameters are obviously smaller and welding fittings are therefore smaller too. The Blade on the Tubing Inspection Gauge is just 2 3/8” (60mm) long, so it will fit in places a longer Blade won’t. The Blade on the Tubing Inspection Gauge could be shorter, however it is used to reference the straight portions of Tube.
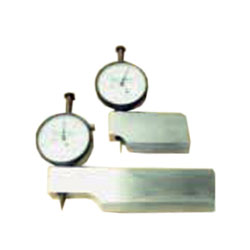
These differences between the two Gauges are illustrated here below, with the Tubing Inspection Gauge on the Top and the Reaching Pit Gauge on the Bottom. The biggest difference between these two Gauges in the length of the ‘Cut-Away’ (Nose), immediately under the Dial indicator. In the case of the Reaching Pit Gauge, it is a large 1 ½” (37mm), to allow it to be used on larger welds, while on the Tubing Inspection Gauge it is just 0.550” (14mm), for tubing’s smaller weld reinforcement.

Like all of Western’s Dial Pit Gauges, the Blade on the Tubing Inspection Gauge is fitted with a Knife Edge, to ensure the operator has a clear view of his target area. More importantly, the Knife Edge allows the operator to ensure the Contact Point of the Dial Gauge is aligned to the small radius surface (convex or concave). Furthermore, Western offers 3 Models of interchangeable Indicators for all of it’s Dial Pit Gauges; Metric, Imperial, and Digital. There are also 3 Models of Contact Points (Standard, Conical, and Needle) offered, that are again interchangeable between the Indicators.
If a welder has to pay extra attention to blend his weld, he runs a greater risk of changing his feed rate. This change in feed rate may cause him to slow and create excessive heat, and thus he runs a greater risk of producing undercut. Therefore, give the welder the tools to better fit up his work piece, and he’ll produce a better weld. If he runs into difficulty, give him the tools to evaluate his undercut.
Western has offered our Reaching Pit Gauge for many years, however the Blade is 4 ¾” (121mm) long. In the case of Instrument Tubing, diameters are obviously smaller and welding fittings are therefore smaller too. The Blade on the Tubing Inspection Gauge is just 2 3/8” (60mm) long, so it will fit in places a longer Blade won’t. The Blade on the Tubing Inspection Gauge could be shorter, however it is used to reference the straight portions of Tube.
These differences between the two Gauges are illustrated here below, with the Tubing Inspection Gauge on the Top and the Reaching Pit Gauge on the Bottom. The biggest difference between these two Gauges in the length of the ‘Cut-Away’ (Nose), immediately under the Dial indicator. In the case of the Reaching Pit Gauge, it is a large 1 ½” (37mm), to allow it to be used on larger welds, while on the Tubing Inspection Gauge it is just 0.550” (14mm), for tubing’s smaller weld reinforcement.

Like all of Western’s Dial Pit Gauges, the Blade on the Tubing Inspection Gauge is fitted with a Knife Edge, to ensure the operator has a clear view of his target area. More importantly, the Knife Edge allows the operator to ensure the Contact Point of the Dial Gauge is aligned to the small radius surface (convex or concave). Furthermore, Western offers 3 Models of interchangeable Indicators for all of it’s Dial Pit Gauges; Metric, Imperial, and Digital. There are also 3 Models of Contact Points (Standard, Conical, and Needle) offered, that are again interchangeable between the Indicators.
- N88-TI Tubing Inspection Gauge
- The Tubing Pit Gauge Blade is 60mm (2.36 inch) long, End Mount, with 14mm (0.55") Node Cut-out.
| Item | Description | Price | ||
|---|---|---|---|---|
N88-TI-D | Digital Tubing Inspection Gauge 60mm (2.36 inch) long blade | $451.00 |
In stock
1 Week Lead Time (Estimated)
2-3 Week Lead Time (Estimated)
Lead Time Varies, Please contact us for availability.
Unavailable


